このトピックでは、WinMerge ファイル比較ウィンドウを使用してテキスト ファイルを比較およびマージする方法について説明します。ここで説明する相違点に関する基本概念を理解するには、最初に ファイル比較とマージの概観 を読むことをお勧めします。 Hex ファイルの関連情報については、Hex形式比較 を参照してください。
ファイル比較操作は、WinMerge ウィンドウまたはコマンド プロンプト ウィンドウから開始できます。
- WinMergeウィンドウから
→ をクリックします。 [ファイルまたはフォルダーの選択] ダイアログを使用して、比較する左右のソース ファイルを指定します。 「ファイルまたはフォルダーの選択」ダイアログの詳細については、「ファイルとフォルダーを開く」を参照してください。
- コマンドプロンプトウィンドウから
WinMerge インストール ディレクトリにある WinMergeU.exe を実行します。コマンド引数に、比較する左右のファイルを含めます。コマンド ラインの使用の詳細については、「コマンドライン」を参照してください。
[ファイル比較] ウィンドウには、比較されたファイルが 2 つのファイル ペインに並べて表示されます。 WinMerge ツールバーとコンテキスト メニューには、相違点の表示、移動、およびマージのための機能が用意されています。以下のスクリーンショットは、ファイルの 2 つのバージョンの比較を示しています。
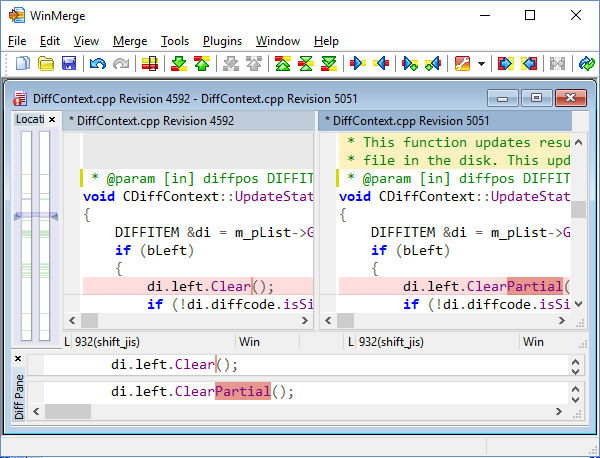
左右のファイル ペインには、比較対象の 2 つのファイルのテキスト内容と相違点が表示されます。ファイル ペインは、差異に移動したりマージしたりするためのメイン領域であり、テキストを直接編集することもできます。このセクションでは、これらのアクションをサポートする機能と、ファイル ペインをカスタマイズする方法について説明します。
各ファイル ペインの上部にあるヘッダーには、ソース ファイルのフル パスが表示されます。左右のファイル名は、ファイル ペインの上にある比較ウィンドウのヘッダーでも識別されます。
ファイル ペインの 1 つは常にアクティブです (ヘッダーの背景が暗いことで示されます)。もう 1 つは非アクティブで、ヘッダー バーが明るくなります。 編集できるのはアクティブなペイン内のみです (「ファイルペイン編集機能」 で説明されているように)。どちらかの側をクリックしてアクティブにし、もう一方の側を非アクティブにします。
ヘッダーのファイル名の前にあるアスタリスク (*) は、ファイル内に未保存の変更があることを示します。
ヘッダー バーのコンテキスト メニューには、ファイル情報のコピーと貼り付けに役立つショートカットがあります。
WinMerge は、ファイル ペインのいくつかの種類の違いを強調表示します。 [オプション] ダイアログの [色] ページでは、ほとんどの相違タイプの背景色とテキスト色のセットを定義し、その状態 (選択されていない、選択されている、削除されている) をバリエーションで示します。このセクションでは、基本的な相違タイプのそれぞれがどのように検出され、表示されるかについて説明します。
- 差異
-
差異ブロックには、異なる 1 つ以上の連続した行が含まれます。デフォルトの差異の背景色は金色ですが、空白行は削除された色でマークされます。
このセクションのこの画面と他の画面では、
行番号の表示を有効にして、ソース ファイル内のどの行が比較されているかを表示しました。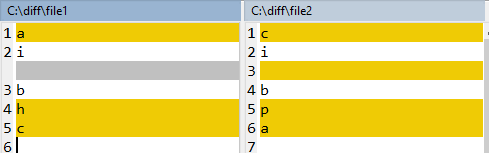
この比較により、3 つの相違ブロックが検出されます。
最初の差異は 1 行です。
file2の空白行には、file1には対応する空白行がありません。 WinMerge は欠落している空白行を削除された差異として扱い、ここではデフォルトの灰色でマークされます。最後の差異ブロックには 2 行が含まれます。
- 無視される差異
-
この色は、WinMerge が無視するように構成したコンテンツをマークします。差異ブロックとは対照的に、無視されたコンテンツは比較されず、何が無視されたかを確認しやすくするために強調表示されるだけです。無視される違いには次のようなものがあります。
空白行 ([オプション] ダイアログの [比較] ページで
空白行を無視を有効にしている場合)。定義した行フィルタのパターンと一致する相違点 (方法については、フィルターの使用 を参照してください)。
次の例では、
Ignore空白行を有効にして前の比較を繰り返します。現在、違いは 2 つだけです。右側の空白行は、無視された差異の色でマークされます。
- 移動
-
[オプション] ダイアログの [比較] ページで
移動ブロック検出が有効になっている場合、移動された相違点は、比較されたファイル内の異なる場所で見つかった同一の行です。 次のスクリーンショットは前の比較を繰り返していますが、今回は移動ブロックの検出が有効になっています。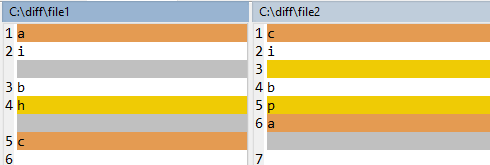
異なる場所にある 2 つの同一の行 (
aとcを含む) が、デフォルトのオレンジ色の移動色でマークされていることに注意してください。この場合の移動ブロック検出のもう 1 つの効果は、最後の 2 行が 1 つの差異ブロックではなく 2 つの別個の差異になることです。場合によっては、移動された差異を表示すると、ファイル内の変更を視覚化しやすくなります。ただし、移動した行が多すぎると、比較が困難になる可能性があります。ご自身の判断で行ってください。
- 単語の差異
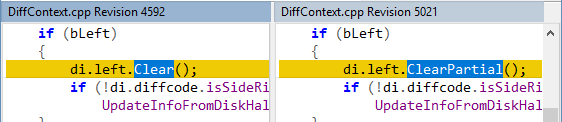
WinMerge は、変更されたテキストを差異ブロックでマークできます。行の違いは単語の違いの色でマークされます。詳細については、「行内差異の強調表示」 を参照してください。
- 類似行
-
[オプション] ダイアログの [比較] ページで
類似行をマッチさせるを有効にすると、WinMerge は差異ブロック内の類似行を整列しようとします。 「similar」 とはどういう意味ですか?一般に、この機能は、強い類似性を持つ行などの単純な場合に最も効果的に機能します。類似した行が検出されると、ファイル ペインで整列するように調整されます。次の図は、類似行をマッチさせオプションを有効にする前と後の、同じ 2 つのファイルの比較を示しています。無効: 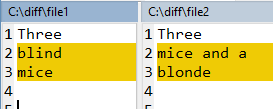
有効: 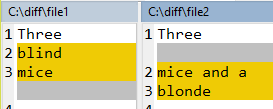
2 番目の比較では、行 「mice」 と 「mice and a」 が類似しているものとして検出されます。 WinMerge は表示に空白行を追加して、これらの行が差異ブロック内の同じレベルに表示されるようにします。
場合によっては、差異ブロックだけでなく、変更されたブロック内のテキストも強調表示すると便利です。次の 2 つの方法で無効または有効にすることができます。
[オプション] ダイアログの [エディター] ページで、すべての
行の違いを表示オプションを設定します。→ をクリックして、線の違いのオンとオフを切り替えます。
注意
WinMerge のナビゲーションおよびマージ機能 (次の差異やコピー左など) は、差異ブロック内の行の差異ではなく、差異ブロックに対して機能することに注意してください。
このセクションでは、行の違いがどのように検出され、マークされるかについて説明します。これらのオプションの効果は、「オプション」ダイアログの「比較」ページの現在の空白設定にも影響されることに注意してください。


WinMerge はフル機能のエディタまたは IDE ではありませんが、元に戻す と やり直し、検索 と 置換、および 移動 などの基本的な編集機能を提供します。これらの基本的な編集タスクは、多くの場合、マージ中に必要になります (差異内のテキストを変更する場合など)。アクティブなファイル ペインで編集できます (ペインをクリックしてアクティブにすることに注意してください)。ペインを結果ファイルに保存するまで、変更はファイルに書き込まれません。
WinMerge の編集機能には、構文の強調表示も含まれています。このオプション機能は複数のファイル形式をサポートしており、使用する色を構成できます。前のスクリーンショットが示すように、構文の強調表示は差異内には適用されないことに注意してください。
ティップ
「ファイルの再スキャン」 の説明に従って、自動再スキャンが有効になっていることを確認してください。そうでない場合は、ファイルの編集の前後にビューを手動で更新して (F5 キーを押して)、WinMerge の差分検出が最新であることを確認します。
→ をクリックすると、ファイル ペインのフォントを選択できます。 WinMerge は固定幅フォントのみをサポートします。
東アジア言語で WinMerge を使用する場合のフォントの推奨事項は次のとおりです。
- 簡体字中国語: SimSun または SimHei 固定幅フォント
- 繁体字中国語: MingLiU 固定幅フォント
- 日本語: MS ゴシック または MS 明朝 等幅フォント
- 韓国語: GulimChe 固定幅フォント (Gulim ではありません。このバリアントでは、グリッド セルの中心に配置されず、固定幅モードでの位置合わせが不十分な比例間隔グリフが使用されるためです)。
ファイル ペインには、行番号といくつかの記号を表示するオプションの灰色の余白があります。余白を表示または非表示にするには、 → をクリックします。複数のファイル比較ウィンドウを使用している場合は、各ウィンドウのマージンを個別に制御できます。マージンには、次の機能の一部またはすべてが表示されます。
行番号 ( → が有効な場合)。
-
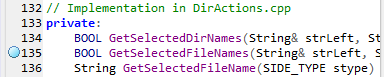
ブックマーク ( → が有効な場合)。ブックマークは、行の隣の余白にある青い円で、WinMerge に記憶させて戻ることができます。
行にブックマークを設定するには、その行の余白をダブルクリックします (または Ctrl+F2 を押します)。同じ操作で既存のブックマークも削除されます。
ブックマークを移動するには、 → をクリックし、 または を選択します。
単一のブックマークをダブルクリックして削除します (または、Ctrl+F2 を押します)。
→ → をクリックしてすべてのブックマークを削除します。
ワードラップ矢印記号 ( → が有効な場合)。
次のスクリーンショットは、ブックマークとワードラップが有効になっているマージンを示しています。行番号がない場合、余白幅は最小限になります。
次のスクリーンショットは、ブックマークと行番号が有効になっているマージンを示しています。余白が広くなっていることに注目してください。実際、マージンは最大行番号に対して十分広いです。したがって、行数が多い大きなファイルの余白は非常に広くなる可能性があります。
WinMerge ツールバーとメニューには、ファイル内の相違点を移動、選択、マージするためのさまざまな機能が用意されています。
注意
WinMerge ショートカットには、フォルダー比較ウィンドウを開いた場合でもファイル比較ウィンドウを開いた場合でも、同じ名前とボタンが付いています。ただし、これらの機能の動作は異なります。ファイル比較ウィンドウでは、機能はフォルダー内の相違点ではなく、ファイル内の相違点に対して動作します。
使用できる差異機能はコンテキストによって異なり、作業中に変化することがよくあります。これは、WinMerge 環境の特定の場所またはその他の条件でその操作が可能な場合にのみ機能が使用可能であることを意味します。たとえば、差異内のテキスト行をクリックすると、ツールバーでいくつかのナビゲーション ボタンとマージ ボタンが有効になることに気づく場合があります。差異内にないテキストの別の領域をクリックすると、これらの機能は使用できなくなります。
差異機能は、WinMerge ツールバーで使用できるほか、次の代替メカニズムでも使用できます。
WinMerge メニュー、特に
ファイル比較ウィンドウ内のコンテキスト メニュー (テキスト内で右クリックした場合)
キーボードショートカット
差異機能については、このトピックの後半の 「差異への移動」 および 「差異のマージ」 で説明します。 クイックスタート と ファイル比較とマージの概観 には、比較とマージの例が示されています。
→ (または F9 を押す) は、差異マージおよびナビゲート機能用の WinMerge 1.7.1 の単一キーボード ショートカットを復元します。
-
前の差異および次の差異機能の Up キーと Down キー。 -
左側にコピーおよび右側にコピー機能の Left キーと Right キー。
マージ モードでは、これらの一般的な操作の Alt キーが省略されます (通常モードよりもすばやく使用できます)。 Shift キーと Alt Arrow キーの組み合わせは、マージ モードでも通常モードと同じように機能することに注意してください。
マージ モードは、ステータス バーに Merge というテキストで示されます。
ファイル ペインの左側にあるロケーションペインでは、比較されるファイルの全長が 2 つの垂直バー (左右のファイル ペインに対応) にマップされます。これは、長すぎて [ファイル] ペイン内で簡単に移動できないファイルを操作する場合に特に便利です。
[場所] ペインには、いくつかの種類の項目が表示されます。
 差異ブロック
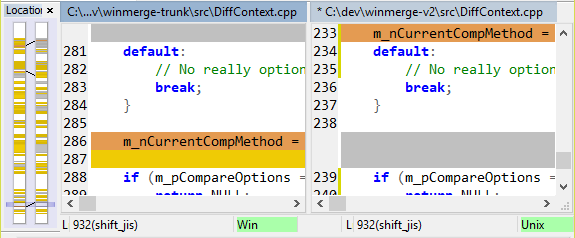
[ファイル] ペインの各差異ブロックは、[場所] ペインで各垂直バーを横切る水平線で示されます。これらの線の太さ、色、位置は、ファイル内のすべての相違点のサイズ (線数)、タイプ、および分布に関する手がかりとなります。たとえば、線の色は、対応する差異ブロックの色と同じです。前のスクリーンショットの [場所] ペインには、多くの基本的な差異 (金色) といくつかの空の差異ブロック (灰色) が表示されます。
 現在の差異
現在の差異差異を選択した場合、「場所」ペインでは、垂直バーの両側にある一対の小さな三角形で現在の差異線をマークします。別の相違点に移動すると、ポインタはその位置に合わせて上下に移動します。ファイル ペインをスクロールしても、ロケーションペイン内の差分ポインタ (または差異行) の位置は変わりません。
 表示領域
表示領域-
[ファイル] ペインに現在表示されているファイルの領域は、[場所] ペイン上の影付き (半透明) ビュー バーで示されます。 エリア バーの高さと位置は、スクロール領域に表示されるファイルの部分に対応します。たとえば、ファイル ペインの高さを変更すると、バーが拡大または縮小することがあります。ロケーションペインのビュー バーとファイル ペインのこの同期により、素早いナビゲーションといくつかの便利なアクションが可能になります。
[ファイル] ペインをスクロールすると、[場所] ペインの表示領域も一緒に移動します。
逆に、[場所] ペインの表示領域バーを上下にドラッグして、[ファイル] ペインをスクロールすることもできます。このスクロールバーの親指アクションは、長いファイルをナビゲートする場合に非常に便利です。
[場所] ペイン内の任意の場所をクリックすると、[ファイル] ペイン内の対応する場所にジャンプします。
- 移動された相違点
-
移動された差異は、異なる場所にある同一の行です。 これらは、[オプション]ダイアログの[比較]ページで[移動ブロックの検出を有効にする]がチェックされている場合にのみ表示されます。 [ファイル] ペインで移動された差異の詳細については、 「差異の強調表示」 を参照してください。ロケーションペインは、左右の場所バーの移動された差異を接続する線を描画します。 例えば:
[場所] ペインのコンテキスト メニューには、次のショートカットが含まれています:
: カーソルをファイルの先頭に移動します。
: 指定した行にカーソルを移動します (「ナビゲーション機能」 で説明)。
: 移動ブロックの移動差色をオフにします。
: すべての移動ブロックの移動された差異カラーをオンにします。
: 現在選択されている移動差分の移動差異のみの色をオンにします。
差異ペインには、選択した差異の両側の内容が表示されます。
差異を選択すると、2 つのバージョンが差異ペインの上部と下部にロードされます。このように、差異ペインでは差異にどの行が含まれているかを確認し、ファイルの残りの部分から切り離してそれらの行を調べることができます。
[差異] ペインで差異を直接マージするには、上側または下側を右クリックし、 または を選択します。
各ファイル ペインの下部にはステータス バーが含まれています。ステータス バーには、ドキュメントとドキュメント内の位置に関するさまざまな種類の情報を含むいくつかのペインが含まれています。
- 行の状態
Ln: ソースファイルの行番号。
-
Col: カーソルの列位置と行内の列の合計数。
Col は、タブを
nスペースとしてカウントします。nは、WinMerge オプションのエディタ ページで タブ サイズ として定義された文字数です (デフォルトでは 4)。 -
Ch: カーソルの文字位置と行内の文字の総数。
Ch はタブを 1 つのタブ文字としてカウントします。
EOL: 現在の行の改行スタイル (WinMerge オプションのエディター ページで 元の EOL を保持 オプションが有効になっている場合にのみ表示されます)。
- 読み取り専用ステータス
(「ファイルの保護」 で説明されているように) ファイルが読み取り専用に設定されている場合、RO がペインに表示されます。それ以外の場合、ペインは空になります。
- ファイルのエンコーディング
ANSI ファイルのコードページ番号、Unicode ファイルの Unicode エンコード タイプ。
- EOLスタイル
-
ファイルの EOL スタイル: Windows/DOS ファイルの Win (CRLF)、Unix (LF)、Mac (CR)、または Mixed。
注意
行ごとの EOL スタイルが使用されている場合、ファイルの EOL スタイルは表示されません (このペインは空白です)。
ファイル比較ウィンドウが開いているとき、WinMerge ウィンドウのステータス バーには、比較されたファイルに関する次のいずれかのメッセージが表示されます。
同一: ファイルに違いはありません
n件の差異が見つかりました: 検出された差異の数。差異が選択されていない場合にのみ表示されます。差異
x/n: 差異の総数における選択した差異のシーケンス番号 (1 から始まります)。
このセクションでは、「ファイル比較」ウィンドウで差異をナビゲートして選択する方法について説明します。相違点を選択すると、その相違点は常に 3 つのファイル ペインの両方またはすべてで選択されることに注意してください。
ティップ
時間を節約するには、WinMerge オプションの [全般] ページで 最初の相違点まで自動的にスクロールする を有効にします。そうすれば、最初の相違点に手動で移動して選択する必要がなくなります。
[ファイル比較] ウィンドウで相違点をナビゲートするための機能と、ツールバーとメニューのショートカットを次に示します。
- 現在行/選択行の差異
-
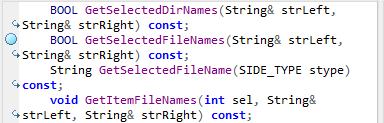
ファイル ペインの差異内のテキストをクリック (または選択) した場合に有効になります。行内の単語の相違点を選択します。例えば:
差異ブロック自体を選択したい場合は、代わりに Current Difference を使用します。
ショートカット:
 ボタン、 → 、F4、差異内のファイルペインのコンテキストメニュー。
 - 次の差異
-
ドキュメント内の現在のカーソル位置の下にある次の相違点を選択します (必ずしも現在の相違点に相対しているわけではありません)。任意の点から相違点を順番に確認するために使用します。最後の差異が現在選択されている場合を除き、使用できます。
ショートカット:
 ボタン、 → 、Alt+Down (マージでは Down)モード)。
 - 前の差異
-
現在のカーソル位置の上にある以前の差異を選択します (必ずしも現在の差異に相対しているわけではありません)。差異を順番に後退するために使用します。最初の差異が現在選択されている場合を除き、使用できます。
ショートカット:
 ボタン、 → 、Alt+Up (マージ モードでは Up)。
 - 最初の差異
-
これを使用して、相違点の比較またはマージを開始したり、他の場所から最初の相違点を特定したりできます。最初の差異が現在選択されている場合を除き、使用できます。テキストをダブルクリックして相違点を選択することもできます。
ショートカット:
 ボタン、 → 、Alt+Home。
 - 現在の差異
-
この機能には 2 つの動作モードがあります。
- カーソルが差異内にあり、差異が選択されていない場合、この機能は差異全体を選択します。これは、キーボードを使用して違いを選択する非常に便利な方法です。
- 現在の差異がある場合、その位置にジャンプします。これは、選択した差異をスクロールして見えなくなった場合に、その位置にすぐに戻りたい場合に便利です。
ショートカット:
 ボタン、 → 、Alt+Enter。
 - 最後の差異
-
現在最後の差異が選択されている場合を除き、有効になります。
ショートカット:
 ボタン、 → 、Alt+End。
 - 移動
-
行番号または差異番号のいずれかにジャンプできます (たとえば、差異 2 は 2 番目の差異です)。 「移動」ダイアログを開きます。ここで、番号、使用するファイル (左側または右側)、および場所のタイプ (行または差異) を指定します。
ティップ
「行番号に移動」は、1 つのファイルから複数のターゲット ファイルに同じ変更をマージする必要がある場合に役立ちます。 を使用してテキストを検索したり、相違点をステップ実行したりするよりも、特定の相違点にジャンプする方が早い場合があります。
ショートカット: → 、Ctrl+G、ファイル ペインおよびロケーションペインのコンテキスト メニュー。
- 移動した行に移動
-
他のパネル(2ペイン)上の現在の差異の差異移動元/移動先へジャンプできるようにします。
ショートカット: Ctrl+Shift+G、ファイル ペインおよび差異ペインのコンテキスト メニュー。
- 左と中央の間の移動ブロックに移動
-
他のパネル (3 ペイン) の現在の差異の差異の移動元/移動先へジャンプできるようにします。
ショートカット: Ctrl+Shift+G、ファイル ペインおよび差異ペインのコンテキスト メニュー。
- 中央と右側の間の移動ブロックに移動
-
他のパネル (3 ペイン) の現在の差異の差異の移動元/移動先へジャンプできるようにします。
ショートカット: Ctrl+Alt+G、ファイル ペインおよび差異ペインのコンテキスト メニュー。
- 表示を更新
「マージ機能」 を参照してください。
マージすると、一方のファイル ペインからもう一方のファイル ペインに差異が左側から右側、または右側から左側にコピーされます。これは、WinMerge の編集機能 (このトピックで前述した) を使用してテキストを直接編集することとは異なります。
デフォルトでは、WinMerge オプションのエディター ページで 自動再スキャン オプションが有効になっています。再スキャンにより、比較およびマージ操作が最新の状態に保たれます。再スキャンしない場合、WinMerge 差異は、外部エディタなどでファイルを比較しているときにファイルに発生する可能性のある変更を検出しません。
再スキャンは、ファイル比較中に特定のアクション (差異のマージやファイルの編集など) を実行すると発生します。ファイルが変更されている場合、WinMerge は別のアプリケーションがファイルを更新したことを通知するダイアログを表示し、ファイルを再ロードするかどうかを尋ねます。
をクリックしてファイルを再ロードしてから続行するか、をクリックして変更を無視し、以前にロードされたファイルのバージョンで作業します。
重要項目
自動再スキャン
が無効になっている場合、またはファイルが変更された可能性があると思われる場合は、マージ操作を実行する前 に
を実行することを強くお勧めします。 → または
![]() ツールバー
ボタンを押すか、F5 を押します。
ツールバー
ボタンを押すか、F5 を押します。
マージ結果が正しくない場合は、 → をクリックするか、Ctrl+Z を押してマージを元に戻します。次に、ファイルを再スキャンして、マージを再試行します。
マージ機能は、カーソル位置またはテキスト選択に基づいて相違点を暗黙的に選択できます。たとえば、差異内の任意の場所をクリックしてから、ツールバーの ボタンをクリックすると、差異ブロック全体がマージされます。これにより、多くの小さな違いを簡単にマージできます。同様に、複数の相違点のすべてまたは一部にまたがるテキストを選択すると、含まれるすべての相違点が 1 つのマージ コマンドでマージされます。
マージ操作の結果が期待したものと異なる場合は、 をクリックして操作を元に戻すことができます。
ツールバーとメニューのマージ機能とそのショートカットは次のとおりです。
- 右側にコピー
-
1 つ以上の差異を左側から右側側にコピーします。差異を完全に選択する必要はないことに注意してください。最も簡単に言うと、これは、ターゲット差異のテキストをソース差異のテキストに置き換えることを意味します。ただし、相違点には空の行が含まれる場合もあるため、新しい行が作成または削除される場合があります。
ショートカット:
 ボタン、 → 、Alt+Right (マージでは Right)モード)、差異内のファイル ペインのコンテキスト
メニュー、および差異ペインのコンテキスト メニュー。
ボタン、 → 、Alt+Right (マージでは Right)モード)、差異内のファイル ペインのコンテキスト
メニュー、および差異ペインのコンテキスト メニュー。 - 左側にコピー
-
現在の差異を右のファイル ペインから左のファイル ペインにコピーします。詳細については、Copy Right の説明を参照してください。
ショートカット:
 ボタン、 → 、Alt+Left (マージでは Left)モード)、差異内のファイル ペインのコンテキスト
メニュー、および差異ペインのコンテキスト メニュー。
ボタン、 → 、Alt+Left (マージでは Left)モード)、差異内のファイル ペインのコンテキスト
メニュー、および差異ペインのコンテキスト メニュー。 - 右側にコピーして進む
-
現在の差異を右側から左のファイル ペインにマージし、次の差異 (存在する場合) を選択します。 1 つのステップの Copy Right と Next Difference に相当します。
ショートカット:
 ボタン、 → 、Ctrl+Alt+右、コンテキスト メニュー差異内のファイルペイン。
 - 左側にコピーして次に進む
-
現在の差異を左側から右側にマージし、次の差異 (存在する場合) を選択します。 1 つのステップの Copy Left と Next Difference に相当します。
ショートカット:
 ボタン、 → 、Ctrl+Alt+Left、コンテキスト メニュー差異内のファイルペイン。
 - すべてを右側にコピー
-
すべての相違点を左側のファイル ペインから右側にコピーします。 1 つのコマンドで 2 つのファイルを同期するために使用します。同様に、
 [元に戻す] をクリックするか、Ctrl+Z を押すと、マージ全体を取り消すことができます。
ショートカット:
![[OK]ボタン](screenshots/allright_btn.png) ボタン、 → 、Alt+Left、差異内のファイル ペインのコンテキスト メニュー。
ボタン、 → 、Alt+Left、差異内のファイル ペインのコンテキスト メニュー。 - すべてを左側にコピー
-
すべての相違点を右のファイル ペインから左のファイル ペインにコピーします。 事実上、左側のファイル ペインの内容を置き換えます。 All Right と同様を参照してください。
ショートカット:
 ボタン、 → 、Alt+Left、差異内のファイル ペインのコンテキスト メニュー。
 - 表示更新
-
ファイルを再スキャンして差異を更新します。自動スキャンが無効になっている場合は、ファイルに変更を加えた後に使用します (詳細については、「ファイルの再スキャン」 を参照)。
ショートカット:
 ボタン、 → 、F5。
WinMerge を使用すると、一部のバージョン管理システムがマージ操作中に生成する競合ファイルを解決できます。競合ファイルは、マージで自動的に解決できない差異が発生した場合に作成されます。これは、2 つのファイルの不完全にマージされたコンテンツを含む 1 つのファイルです。 WinMerge は競合ファイルを個別のファイルに分割し、それらのファイルをファイル比較ウィンドウで開きます。その後、WinMerge の比較およびマージ機能を使用して競合を解決し、マージされた結果ファイルを保存できます。
-
→ をクリックし、開くダイアログを使用してファイル システム内の競合ファイルを選択します。 [ファイル比較] ウィンドウで競合ファイルが開きます。
左側のファイル ペインのファイル ヘッダーのタイトルは、Theirs File です。この側は、通常、バージョン管理システムのリポジトリにあるファイルを表します。通常、このファイルは編集できないため、WinMerge は左側の [ファイル] ペインを読み取り専用に設定します。 これは、差異をこのファイルから他のファイルにのみマージできることを意味します。
-
右側のファイル ペインには、Mine File というタイトルが付いています。この側はファイルの作業コピーです。すべての変更は、結果ファイルであるこのファイルに対して行う必要があります。
Mine File 側は、競合ファイルを開いた後に変更されるように設定されます (ファイル ペインのヘッダーにアスタリスクが表示されます)。これにより、変更が必要ない場合は、ファイルをすばやく保存できます。また、ファイルの解決を忘れることがなくなります。ファイルを保存しないことを選択した場合、元の競合ファイルは変更されません。
このトピックで前述した通常の比較およびマージ機能をすべて使用して、[Mine File] ペインの競合を解決します。
完了したら、Ctrl+S をクリックして、Mine File 側を結果ファイルとして保存します。デフォルトでは、新しいバージョンは元の競合ファイルを上書きします。または、 → → をクリックし、別のファイル名を選択することもできます。
多くのバージョン管理システムでは、外部マージ ツールを構成できます。そうであれば、マージ競合が発生したときにバージョン管理システムで WinMerge を自動的に起動できる可能性があります。
また、WinMerge コマンド ラインから競合ファイルを開くこともできます。このコマンド
ラインでは、Theirs、Mine、およびオプションで
Resolved (競合ファイルとは異なる結果ファイルが必要な場合) の 3
つのファイル名パラメータを受け入れます。詳細については、「コマンドライン」を参照してください。競合ファイルへの単一パスもコマンド ラインで受け入れられます。